

Most WooCommerce stores struggle to keep customers coming back. You spend on ads, win a sale, and then start over from zero. A WooCommerce loyalty program ends that cycle.
When customers earn points for every purchase, they start treating your store like their go-to brand, much like the Starbucks point system keeps coffee buyers loyal for years.
This guide breaks down, step by step, how to build a loyalty rewards program inside WooCommerce using myCred WooCommerce Plus.
By using this guide, you can turn one-time buyers into repeat customers with a point-based loyalty program that pays off for both sides.
Step by Step Guide to Create WooCommerce Loyalty Program

Here is a step-wise process to design an effective loyalty program for WooCommerce stores:
Step 1: How to Prepare Your eCommerce Store for a WooCommerce Loyalty Program
Before you start building your WooCommerce loyalty program, make sure your foundation is ready. A rewards system only works when your store is stable, secure, and correctly configured.
Here’s what you need in place before moving forward:
1. WordPress + WooCommerce Installed
You can’t launch a customer loyalty program without a functional store. Confirm WooCommerce is installed, checkout pages are working, and your theme supports the latest version.
2. Install the myCred Core Plugin
This free plugin is the engine behind your loyalty program points system. It handles point balances, logs, and reward hooks. Install it from your WordPress dashboard by searching “myCred” under Plugins → Add New → Install → Activate.

3. Get the myCred WooCommerce Plus Add-on
To connect points directly to purchases, you’ll need myCred WooCommerce Plus, available in Toolkit Pro. Download it from the official myCred Toolkit Pro.

This add-on turns your regular shop into a WooCommerce rewards program, complete with hooks for referrals, product-based points, and redemptions.
4. Activate Your License Key of myCred Toolkit
After purchase, log in to your myCred account, copy your license key, and activate it under myCred → Settings → Licenses. This ensures updates and integrations work properly.
5. Backup Your Site
Before changing anything, take a full site backup (database + files). If something breaks during setup, you can roll back instantly.
Once these essentials are in place, you’re ready to start crafting a point-based loyalty program that runs as smoothly as the Starbucks point system, but built entirely inside your WooCommerce store.
Step 2: Installing and Enabling the WooCommerce Plus Add-on
With your environment ready, the next step is connecting myCred to WooCommerce through the WooCommerce Plus addon. This is where your WooCommerce loyalty program begins to turn purchases, reviews, and referrals into real loyalty rewards for customers.
Make sure you have WooCommerce Plus active in myCred Toolkit.
1. Upload and Install the Plugin
In your WordPress admin panel, go to myCred → Toolkit → Enable WooCommerce Plus.

NOTE: You need to enable the “WooCommerce” module from myCred Built-in addons for this. See the screenshot below:

2. Verify Under myCred Settings and WooCommerce Tabs
Inside myCred → Settings, look for new tabs labeled “WooCommerce” or “WooCommerce Plus.”
In the WooCommerce section of your dashboard, you’ll also notice new reward options attached to product pages, checkout, and customer account screens.
These hooks are what make your WooCommerce rewards program fully dynamic.

3. Keep Your Version Updated
Always run the latest version of myCred and WooCommerce Plus. Vulnerabilities in older builds can expose your loyalty rewards program to exploits.
Check changelogs on Wordfence or within your dashboard for updates, and patch immediately when new releases appear.
4. Activate Supporting myCred Add-ons
For advanced functionality—such as ranks, badges, or payment gateways — activate the required myCred modules under myCred → Add-ons.
- Gateway: lets customers pay or partially pay using points.
- Badges / Ranks: add achievement-style gamification to your point-based loyalty program.
These features transform your store from a simple shop into a complete WooCommerce rewards ecosystem, similar in behavior to the Starbucks point system but tailored entirely to your brand.


Step 3: How to Configure WooCommerce Loyalty Program Via myCred
Once the WooCommerce Plus add-on is active, it’s time to configure the engine that powers your WooCommerce loyalty program. This step defines how points are calculated, awarded, and displayed across your store, which is the true backbone of any loyalty rewards program.
1. Set Up General Settings
Go to myCred → Point Type → Settings. Here, define:
- Point type: create a clear label (e.g., “Store Points” or “Reward Credits”).
- Format: choose decimal places and prefixes/suffixes.
- Display: set how points appear on product pages, carts, and user dashboards.
This structure gives your loyalty program points system a consistent look across every transaction.

2. Configure Hooks for Actions and Rewards
Open myCred → Hooks and enable the triggers that earn or deduct points. According to the myCred Documentation and Elegant Themes setup guide, you can assign:
- Points for each order
- Points for the number of orders
- Points for first order
- Points for order range
Each hook lets you specify how many points users earn or lose, ensuring your WooCommerce rewards system aligns with your business model.

3. Logging and Transaction History
Enable detailed logs under myCred → Point Type → Log to track when points are awarded or spent. This transparency builds trust within your customer loyalty programs, allowing users to see exactly how they earned their rewards.
Once configured, your store now runs a functional point-based loyalty program. It’s the one that mirrors proven systems like the Starbucks point system, but tailored to your WooCommerce ecosystem.


Step 4: Reward Rules & Earning Mechanics
Now that your system is configured, define how customers actually earn points inside your WooCommerce loyalty program. This is where the engagement loop begins, including every purchase, referral, or milestone that feeds your loyalty rewards program and keeps users coming back.
1. Set Per-Product Point Rewards
– Each product can carry its own reward value.
– Edit any WooCommerce product → scroll to the Product Data panel → locate the myCred Reward Points field.
– Enter how many points the buyer earns when purchasing that item.

As outlined in the myCred Codex, this per-product control lets you boost rewards on high-margin or slow-moving products while maintaining balance across your WooCommerce rewards program.
2. Add Conditional or Range-Based Bonuses
Inside myCred → Hooks, create bonus conditions such as “spend between $50–$100 = +50 bonus points.”
This dynamic system, explained on WooCommerce Plus, drives higher cart values without feeling like a discount. Customers chase the next reward tier, the same psychological loop used in the Starbucks point system.

3. Reward Order Frequency and Purchase Milestones
Use built-in myCred hooks to grant bonus points after a customer completes a certain number of orders, e.g., +200 points on the fifth purchase.
Documentation from myCred.me confirms that recurring incentives increase customer lifetime value and reinforce retention patterns typical of successful customer loyalty programs.

4. Enable Referral Rewards
Activate the WooCommerce Product Referral hook under myCred → Hooks.
Define how many points are earned when a referred visitor purchases a product.
Here, the user will earn points with each order they place. As you can see below:

5. Rank and Badge Rewards
Go to myCred → Add-ons → Ranks / Badges, enable them, and define achievement thresholds (e.g., 5,000 points = “Gold Member”).
When a user reaches that rank, you can automatically issue a coupon.
According to myCred documentation and WooCommerce guides, layering ranks and badges over your point-based loyalty program transforms shopping into a long-term game loop.
Customers don’t just buy; they compete, progress, and return to maintain their level of satisfaction.
This structure defines exactly how points flow through your loyalty program points system, ensuring every purchase, referral, or milestone strengthens retention and profitability.
Step 5: Redemption & Usage Rules
Earning points means little unless customers can redeem them easily. This stage transforms your WooCommerce loyalty program from a reward tracker into a fully functional payment and discount system.
1. Enable the myCred Gateway
Go to WooCommerce → Settings → Payments and activate the myCred Gateway. This lets customers pay for orders directly using points.
According to the myCred documentation, this gateway integrates seamlessly with standard checkout workflows. Users can choose to pay fully in points or mix them with other payment methods.
Here, you can set two point types, like on the basis of Points or Tokens, shown in the screenshot below.

2. Configure the Exchange Rate
Define how many points equal one unit of currency under WooCommerce → Settings → Payments → myCred.
Example: 100 points = $1.
Getting the conversion right keeps your loyalty program points system profitable while still feeling valuable to users.

3. Allow Partial Payments
Enable the Partial Payment option under the myCred > WooCommerce. This feature, outlined in myCred’s guide, allows customers to pay with both points and money in the same transaction.
This flexibility mirrors how real-world brands like Starbuck point system lets users combine loyalty currency and cash.


4. Convert Points to Coupons & Display Coupons When Redeemable
If you prefer not to let customers pay directly with points, use the Coupon Generator under myCred → Woocommerce → Coupons.


When users convert points to coupons, show available coupon codes directly under their “My Account → My Coupons” tab.

This immediate visibility prevents forgotten rewards and strengthens retention inside your point-based loyalty program.
Together, these display tactics make your WooCommerce rewards visible, interactive, and emotionally rewarding.
5. Restrict Purchasable Products or Categories
You can limit which items are eligible for purchase using points. EIther a user has Ranks or Badges, you (as an admin) can restrict product and product category.
Under myCred → Woocommerce → Restrict Products, select categories or products excluded from redemptions.
myCred documentation explains that restricting premium or low-margin items protects store profitability while keeping your customer loyalty programs sustainable.


Step 6: Display & User Interface
A WooCommerce loyalty program only works when customers can see their progress. Visibility builds motivation. Every visible point, badge, and milestone deepens engagement. This section focuses on creating that feedback loop through clear UI elements inside WooCommerce.
1. Show “Earn X Points” on Product Pages
Admin Dashboard > myCred > WooCommerce > Display Rewards.
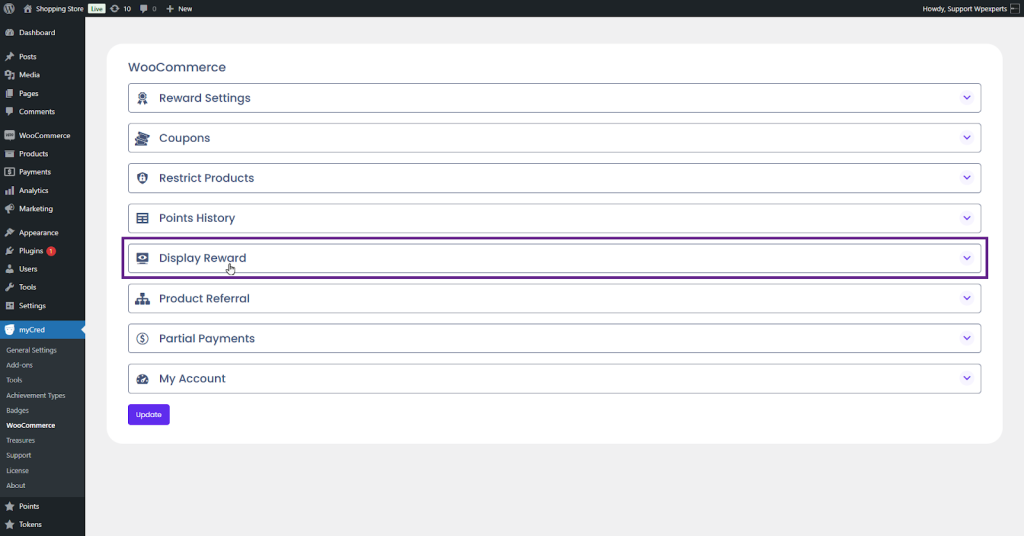
You can automatically display:
- “Earn 25 points for this purchase” is beneath the product price
- “You’ll get 50 bonus points” on sale items or promotions
This simple display converts abstract value into visible motivation. The same principle is driving repeat engagement in the Starbucks point system.


2. Show Point Balance and History in Customer Accounts
Enable the Points History from myCred → WooCommerce → Points History.
Through points history, customers feel their participation in your WooCommerce rewards program is tangible and fair. Integrating logs with standard WooCommerce account pages ensures it blends seamlessly into their usual shopping flow.


Step 7: Advanced Features of WooCommerce Loyalty Program Plugin
After setting up the base earning and redemption structure, myCred WooCommerce Plus allows for deeper control through advanced configurations. These extend the standard woocommerce loyalty program into a dynamic reward ecosystem that connects with other WordPress tools and workflows.
1. WooCommerce Subscriptions — Pay with Points
The myCred WooCommerce Plus addon supports WooCommerce Subscriptions integration, enabling users to pay for recurring plans using accumulated points.
As outlined on myCred.me, points can cover full or partial subscription payments. This is critical for membership-based stores, turning loyalty into recurring retention rather than one-time conversion.


2. Multi Point Types (Multiple Currencies)
Use myCred → General Settings → Point Types to create multiple point currencies, for example, “Store Credits,” “Referral Points,” or “Event Tokens.”
myCred.me confirms that each point type can have separate earning, expiration, and redemption rules. This allows complex loyalty setups such as:
- Exclusive point systems for premium users
- Referral-only point currencies
- Cross-brand reward ecosystems inside WooCommerce multisite networks

Ending Note
A WooCommerce loyalty program built with myCred WooCommerce Plus transforms standard transactions into long-term customer relationships. By combining point-based rewards, referrals, badges, and subscription payments, you create a full loyalty rewards program that mirrors global models like the Starbucks point system. Every purchase, review, or referral becomes part of a measurable loyalty program points system, driving retention, repeat orders, and brand advocacy directly within your WooCommerce store.
